


Decorating a dog crate is easy and can make it more inviting for your pup. Start by adding comfortable bedding, such as a plush blanket or pillow. Choose something that will provide cushioning and warmth, like fleece or memory foam.
Place the bedding in the middle of the crate so your pup has plenty of space to move around. You can also add toys, treats, and chews to create an exciting environment inside their crate. Use colorful treat balls, stuffed animals, or chewable bones to entice them into their den.
Finally, use wall decorations like paintings or photos featuring you and your pet together to make them feel even more at home in their new spot!
- Gather Supplies: Before beginning any decorating project, it is essential to gather the necessary supplies. For a dog crate decoration project, you will need fabric in your desired color or pattern, scissors, and a glue gun with glue sticks.
- Measure Fabric: Use enough fabric to cover all four sides of the dog crate, plus an additional two inches on either side for overlap and seam allowance. Once measured correctly, cut out the fabric with scissors
- Glue Fabric to Crate: Begin by covering one side of the crate at a time, starting with the top and working down toward the bottom while gluing along each edge as you go around until all four sides are entirely covered in fabric. Be sure to press firmly against edges so that they adhere properly to create an even finish look once complete.
- Trim Excess Fabric: After all four sides have been glued down securely using your glue gun, trim away any excess material from each edge using scissors for a neat appearance when finished decorating your dog crate!
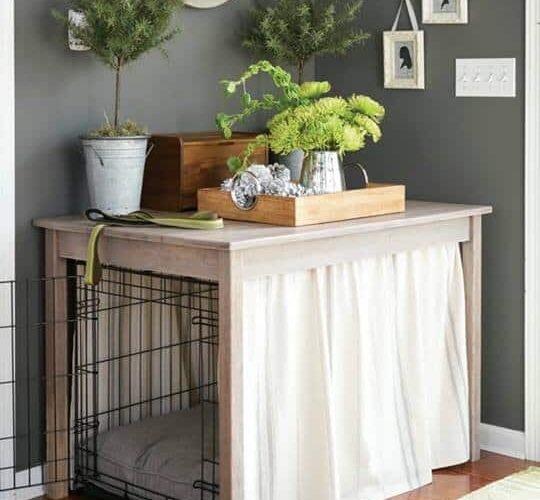
DIY Dog Crate Topper – quick & easy cover that doubles as a table!

Credit: rumfieldhomestead.com
You will need several items to decorate a dog crate.
- Paint or stickers
- Fun fabric
- Cushion or bedding
- Toys and treats
Depending on your crate type, you may need additional items such as screws, glue, and wood. Make sure to check your requirements before starting any project.
To ensure your pet is safe around decorations, there are a few steps you can take:
- Choose materials that won’t be dangerous if ingested or chewed. Natural items such as pine cones and dried plants are excellent options.
- Ensure any string or ribbon is thick enough not to get tangled in fur or caught on teeth.
- Keep fragile items like glass out of reach. Consider using flame-resistant alternatives for things like lights and candles.
- Ensure cords from electrical devices are hidden away and unplugged when not in use.
By following these steps, you can ensure your decorations don’t risk your pet’s safety.
To avoid items that the animal could swallow or chew, take care to:
- Select toys made for pets and not children.
- Inspect existing toys regularly for signs of wear or damage.
- Ensure the pet can’t take apart the toy and any parts are too big to swallow.
- Store small items away from your pet’s reach when not in use.
Always supervise playtime with small animals to ensure they don’t put anything dangerous in their mouth.
To start painting the crate, taking certain precautions is essential:
- Gather all the necessary materials and supplies, including paintbrushes, roller brushes, drop cloths, and a ladder if needed.
- Prepare the surface by cleaning off dirt or debris with a damp rag.
- Sand down any rough areas before applying primer.
- Use painter’s tape to cover areas you don’t want to be painted over.
- Apply an even layer of paint using a brush or roller for the best results.
Once these steps are completed, your freshly-painted crate will be ready for use!
Two coats of waterproof paint are essential to ensure the durability of surfaces over time. Here are some helpful tips:
- Use a roller brush or sprayer for even coverage.
- Allow adequate drying time between coats.
- Apply two thin, even layers rather than one thick layer.
This will help create a protective barrier that will last longer and be more resistant to damage from the elements, such as water, humidity, and temperature changes.
Once the painting is complete, it must be left to dry. This process typically takes 1-3 days, depending on the type of paint used and environmental factors. To ensure that all layers are thoroughly dried before adding any additional decorative elements, here’s what you should do:
- Let the painting sit for 24 hours after completion
- Use a fan or blow dryer to speed up drying times if necessary
- Check for patches that may still be damp and let them air out until fully dry
Following these steps guarantees that your artwork will look its best with no streaks or blurring from wet paint.
Conclusion
In conclusion, decorating a dog crate can be an enjoyable and rewarding experience for you and your pup! With suitable materials and tools, creating a comfortable area for your furry friend that is also aesthetically pleasing is easy. Whether you go with DIY decorations or buy something from the store, make sure that whatever you select is safe for your pup.
Have fun creating the perfect space for your pup!