


Do you have a cat that always seems to be cold? Or maybe you just want to make a festive sweater for your feline friend for the holidays. This guide will teach you how to knit a cat sweater!
You will need: -Size 10 needles (5 mm) -Worsted weight yarn in two colors (we used red and green)
-Tape measure -Yarn needle Cast on 36 stitches using the long tail method.
Join in the round, being careful not to twist your stitches.

- Choose the right size yarn and needles for your cat
- Cast on enough stitches to fit around your cat’s body
- Knit in the round until the sweater is the right length for your cat
- Incorporate some shaping to make sure the sweater fits well around your cat’s neck and chest
- Finish off with a nice ribbed edge at the bottom of the sweater
Knit in the Round – Adult cat sweater
Assuming you would like a step-by-step guide on how to knit a cat sweater: You will need: -yarn (preferably in a color that your cat likes)
-knitting needles -a tape measure -scissors
-a yarn needle (for weaving in the ends)
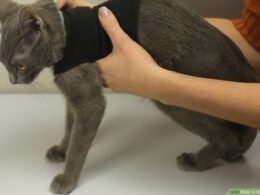
- Measure your cat from the neck to the tail’s base. This is how long you will make the body of the sweater.
- To determine how wide to make the sweater, measure around your cat’s chest at its widest point. You’ll want the sweater to be somewhat snug but not too tight. Add 2 inches (5 cm) to this measurement to allow for movement and growth. This is now your width measurement.
- Using these measurements, cast stitches onto one needle using the long tail method (or any other method you’re comfortable with). The number of stitches you’ll need to throw on will depend on your gauge (the number of stitches per inch). A good rule of thumb is that there are usually four stitches per inch (2 cm). So, if your cat’s measurements were 12 inches long by 10 inches wide, you would need to cast on 48 stitches for the length and 40 for the width: 48 + 40 = 88 total stitches. However, it’s always best to knit up a tension/gauge swatch first before starting your project so that you can adjust accordingly! Once you’ve cast on all 88 of your stitches, it’s time to start knitting! You’ll want to use either stockinette stitch or seed stitch for this project – both are nice and easy and won’t require much shaping once we start putting everything together later. For our purposes here, let’s say we’ve chosen stockinette stitch, which means we’ll be knitting one row then purling one row until our work measures 12″ (30 cm), or however long we decided our sweater needed to be earlier on when taking measurements. Remember to slip that first stitch as if to purl every time so that you don’t end up with an extra stitch at the beginning/end of each row! Now might also be a good time to break off and weave in those pesky ends…
- Once we have our desired length, we should start working on those decreases for our armholes! We’ll be doing what’s called ‘raglan decreases,’ which means we’ll be decreasing four stitches at each ‘armhole.’ To do this evenly across our work, we’ll decrease one stitch at each armhole edge on every right side row until only 20 sts remain – 5 decreased rows. To decrease one stitch at an armhole edge, simply knit two together, then slip the resulting stitch over the next stitch – easy peasy! Now might also be a good idea to try slipping our work onto some scrap yarn or holders so that things don’t get too confusing later when we come back around again to finish off those sleeves! front: 22sts rem; back: 24sts rem; left sleeve: 9sts rem; right sleeve: 9sts rem
- With five raglan decrease rows complete, it should look something like this…
Assuming you would like a blog post discussing how to knit a cat for beginners: “How to Knit a Cat for Beginners” Instructions and a video on how to knit a cat pattern for beginners.
This easy step-by-step guide will show you how to make cute little knitted cats. You will need some basic knitting supplies, including yarn and needles. The finished product makes a great gift or decoration.
If you are new to knitting, don’t be discouraged – it is quite easy to learn! Many online resources and YouTube videos can teach you the basics. Once you know how to do the basic stitches, you can knit anything.
And what could be more fun than making your very own knitted cat? This project is perfect for beginner knitters as it only requires two basic stitches – the knit stitch and the purl stitch. If you can master these, you can easily make this adorable little kitty.
Yes, there are sweaters made specifically for cats! These sweaters can help keep your feline friend warm during the colder months. There are many different styles and designs, so you’re sure to find one that your cat will love.
Most people think of knitting as a human activity, but it can be fun for cats, too! While you can’t exactly knit a cat toy, you can make a simple ball of yarn for them to play with. All you need is some yarn and a pair of scissors.
Cut a length of yarn about two feet long and tie it into a loop. Then, take another length of yarn and tie it around the center of the first loop. This will create a ball with two tails hanging off of it.
Cats love to swat at these tails and chase the ball around, so have fun watching your feline friend enjoy their new toy!

Credit: www.youtube.com
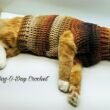
Easy Cat Sweater Knitting Pattern Free
Are you looking for a quick and easy cat sweater knitting pattern? Look no further! This free pattern is the perfect project for any level of knitter.
This simple knit sweater is worked in one piece from the neck down. It features a ribbed turtleneck collar and three-quarter sleeves. The body is worked in stockinette stitch with garter stitch borders at the sides.
The sleeves are also worked in stockinette stitch with garter stitch cuffs. Size: Small (Medium, Large) Finished Measurements: Neck circumference: 8 (9, 10)”; Body length: 9 (10, 11)”; Sleeve length: 6 (6½, 7)”
Yarn Requirements: worsted weight yarn such as Valley Yarns Northampton (100% Wool; 100g/247yds) 1 skein color of your choice
Free Knitting Pattern for Cat Sweater
Are you looking for a free knitting pattern for a cat sweater? I have the perfect way for you! This cute and cozy sweater will keep your kitty warm all winter.
The best part about this pattern is that it’s easy to follow and can be customized to fit any size cat. To begin, you will need to gather some supplies. For this project, you will need worsted-weight yarn, size 8 (5mm) needles, tapestry needles, and scissors.
If using a different yarn weight or needle size, adjust your gauge accordingly. Once you have your supplies gathered, it’s time to start knitting! The body of the sweater is worked in one piece from the bottom up.
The sleeves are picked up along the armholes and worked in the round. To make things easier, I’ve written out both sets of instructions separately. Body of Sweater:
Cast on 36 stitches using your preferred method. I like to use the long-tail cast for projects like this. Place a marker at the beginning of the row and join in the round, being careful not to twist your stitches.
You will work in knit stitch (k) for 14 rows or until your piece measures 4 inches from the cast-on edge (this will be our hem). Next, we’ll work in stockinette stitch (alternate between knit and purl rounds). Work in stockinette until your piece measures 8 inches from the cast on edge or until it’s long enough to comfortably fit around your cat’s chest with a little extra room (we want our cats to be comfortable, after all!).
Once you’ve reached the desired length, it’s time to shape your armholes by binding off four stitches at the beginning of each of the next two rounds (8 stitches total). You should now have 28 stitches remaining on your needles. Continue working until your piece measures 12 inches from where you bound off those first eight stitches or until it’s long enough to reach just below your cat’s neckline when draped over its shoulders. Again, bind off four stitches at beg of the next two rds (8 sts dec). You should now have 20 sts rem. Work even until the same measurement as the back panel. Now we’ll work our shoulder shaping by binding off four sts at the beg of the next two rds, then 3sts at the beg of foll 2 rnd, then 2sts at beg foll rnd , then 1 st foll rnd – 10 shoulder sts rem. Break yarn, leaving a tail approx 6” long. Use a tapestry needle to thread through rem live sts & cinch closed. Fasten off & weave in ends.
Cat Sweater Knitting Pattern Straight Needles
If you’re looking for a fun and festive knitting project this holiday season, why not try making a cute cat sweater? This pattern uses straight needles and is relatively simple, so it’s perfect for beginners. And who doesn’t love a warm, cozy sweater to keep them comfortable on cold winter days?
What You’ll Need: -4 skeins of worsted weight yarn in colors of your choice (I used red and green) -Size 8 straight knitting needles
-Tape measure -Scissors -Yarn needle
Instructions:
- 1Cast on 36 stitches using one of the yarn colors.
- Knit in stockinette stitch until your piece measures 18 inches long.
- Change to the other color of yarn and knit two rows.
- Purl one row.
- Decrease one stitch at the beginning and end of the next two rows (you will now have 32 stitches).
- Knit two rows
- Decrease one stitch at the beginning and end of every row until you have 24 stitches remaining
- Change to the first color again, 9Purl one row.
- Increase one stitch at the beginning and end of every row until 32 stitches
- Knit four rows
- Cast off all stitches
- Sew side seams together
- Weave in all loose ends
- Put it on your kitty and enjoy!
Conclusion
This blog post provides clear instructions on how to knit a cat sweater. It includes a step-by-step guide with photos and a video tutorial. The author also offers helpful tips on choosing the right yarn and needles and advises measuring your cat for the perfect fit.